Earthing connects all the major electrical equipment in our house such as fridge, AC, washing machine, grinder to the ground. So when there is an event of a power surge or lightning strike the extra current formed in the system is easily drawn down to the earth, protecting them from fire or damage.
Here are the reasons to do an effective house earthing:
a) To protect electrical appliances from damages arising due to faulty currents.
b) To prevent the risk of fire outbreaks that may arise from current leakage.
c) To maintain a stable voltage in three-phase circuits of an electrical system, even when the load is unstable.
d) Earthing prevents electric shock and damage caused by lightning strikes, by providing a low resistive path that quickly carries the fault currents to the ground.
In house wiring, a connection from the earth point of all sockets is connected to the earth link in the Distribution Box. From the distribution box (DB), we connect them to the earth plate or earth electrode.
Whenever there is a circuit overload or power surge, current flows through the earth electrode to the ground. House earthing protects you from electric shock by providing a conductive path that carries the faulty current to the ground.
House Electrical grounding is one of the easy techniques for electrical safety in a house and requires the following materials:
They include spanners and pliers to adjust the clamp, a continuity tester to test for continuity.
Other tools needed for earthing include a shovel, digger, or excavating machine.
You can easily check whether your house earthing is effective using a few simple methods. In this section, we will discuss two reliable ways to determine if your earthing system performs efficiently. Moreover, these checks can help you detect any hidden faults and ensure long-term electrical safety.
Plug the wires from the lamp into the positive and negative ports of the outlets or sockets. The positive port should go to the right hole of the socket, while the negative port should be connected to the left hole. Turn ON the switch, and you will see the bulb glowing brightly. Now, remove the negative wire and insert it into the earthing port (the top hole) of the socket. The bulb should glow brightly as before. If it does not glow, it means there is no earthing in the house. But if the bulb glows and dims or flickers, it means that the house earthing is faulty.
If a house is not earthed, people and animals living there may get electrocuted whenever there is a power surge. It may also damage the appliances and can even cause a fire outbreak. So it is crucial to have an efficient earthing done for every house.
In addition, regular testing and maintenance of the earthing system are equally important to ensure its long-term effectiveness. Over time, soil conditions, corrosion, or loose connections can weaken the system’s performance. By conducting periodic inspections and resistance tests, homeowners can ensure continuous protection against electrical hazards and maintain overall electrical safety.
Click here to view all of Axis’s Lightning Protection, Lightning Arresters and Earthing products.
FAQ
Q1. What is house earthing and why is it important for electrical safety?
A: House earthing is the process of connecting electrical appliances and systems to the ground to safely discharge excess current during faults, surges, or lightning strikes. It helps prevent electric shocks, protect appliances from damage, reduce fire risks, and maintain voltage stability, making it essential for residential electrical safety.
Q2. How does Axis Electricals design effective house earthing systems?
A: Axis Electricals designs house earthing systems by following IS 3043 standards and best engineering practices, ensuring proper electrode selection, earthing depth, soil treatment, and conductor sizing. Their solutions are tailored to provide low resistance, high safety, and long-term reliability for residential installations.
Q3. How can you test if your house earthing system is working properly?
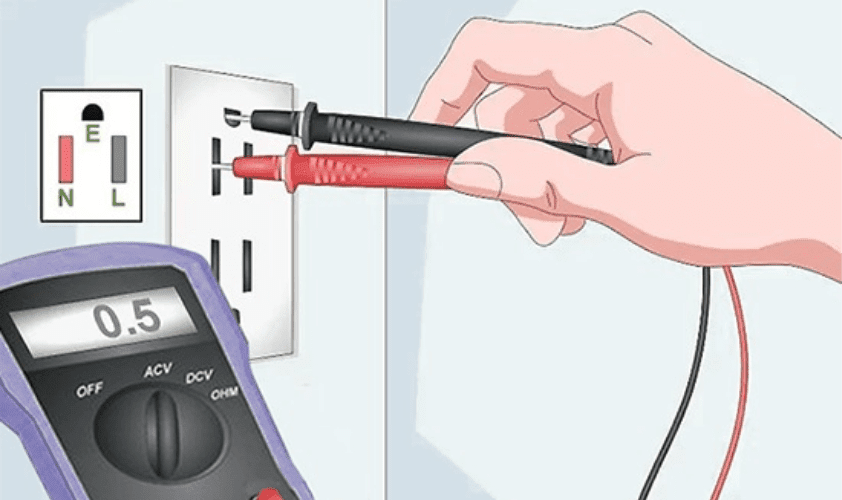
A: You can test house earthing using a test lamp or a multimeter. In the test lamp method, the bulb should glow properly when connected to the earthing port. Using a multimeter, the voltage between live-to-neutral and live-to-earth should be nearly the same. Any variation indicates faulty or ineffective earthing.
Q4. Why should you choose Axis Electricals for house earthing installation and testing?
A: Axis Electricals offers complete earthing solutions, including design, installation, testing, and maintenance. With high-quality materials and compliance with national and international standards, they ensure safe, durable, and efficient house earthing systems for long-term protection.
Have you ever noticed how cables safely enter and exit electrical enclosures? This is made…
Heat shrinkable products are polymer components that shrink when you apply heat. During manufacturing, we…
A Termination Kit is used to safely connect a cable to equipment like switchgear, transformers,…
In any electrical system, things can go wrong. Wires can get damaged, insulation can crack,…
Every year, thousands of people are injured or killed by lightning strikes. What many don't…
A Distribution Box contains live electrical components and must provide insulation and protection during normal…