Lugs & Connectors

Crimping Lugs as per UL 486A-486B Simplified!

Improper cable lug installation can put your entire electrical system at risk. Read this blog to learn the safe way of crimping lugs according to the UL 486A-486B standard. This blog will guide you on properly crimping lugs, also known as terminals, in compliance with UL standards.

Installation Process of Cable Lugs

How to crimp lugs

Note: Before starting, please ensure that you use proper tools, procedures and personal protective equipment to avoid injury. Also kindly follow these do’s and don’ts suggested by UL 486A-486B.

Do’s

  • Always confirm that cable strands have entered fully into the barrel.
  • After removing the cable insulation do not remove or cut any wire strands. Use the complete barrel for crimping.
  • Ensure that all wire strands are inserted in the long barrel.
  • Use only the recommended size of lug for recommended size of cable.
  • If multiple crimps are required, make the first crimp when crimping lugs closest to the Lug Palm.

Don’ts

  • Do not strip cable insulation more than recommended.
  • Do not use crimping dies for crimping lugs that don’t match, for example using a 35 mm² die for the first crimp and a 50 mm² die on the second.
  • Do not use any other tool for crimping than the recommended one by the manufacturer.
  • Do not insert multiple smaller cables into a lug designed for a single larger cable, such as two 35 mm² cables in a 70 mm² lug.


Accessories & Tools for Proper Installation

  • Wire Brush
  • Marker
  • Oxide Inhibiting Compound (For Aluminium lugs only)
  • Cable Insulation Stripper
  • Crimping Tools & Dies
  • Measuring Tape


Talk to our engineers!

    Installing a Single Hole Cable Lug

    Pre-requisites

    Choose the crimping tool and dies with the exact dimensions recommended by the cable lug manufacturer. Check the markings on the connector or the labels on the packages to verify.


    Cable Preparation

    • Step 1: Measure the distance of the insertion depth of the lug to be used. In this case, the strip length will be the Barrel length + 6 mm.
    • Step 2: Once measured, mark the distance on the cable using a marker.
    • Step 3: Using a suitable stripper, cut and remove the cable insulation leaving sufficient extra allowances. Approximately 3mm to 5mm.
    • Step 4: Clean or brush the surface of the conductor using a wire brush to remove any oxidation.
    • Step 5: Apply Oxide Inhibiting compound recommended for aluminium on the cable strands.

    Note: Axis Aluminium Cable Lugs are supplied with factory-filled oxide inhibiting compounds.


    A) Using Battery-Operated Crimping Tool

    • Step 1: Insert the cable or conductor into the barrel of the cable lug.
    • Step 2: Use the crimping tools & dies for the crimping process as specified in the Instruction sheet.
    • Step 3: Complete the crimping process as shown.

    B) Using Hand Held Hydraulic Crimping Tool

    • Step 1: Insert the cable or conductor into the barrel of the cable lug.
    • Step 2: Use the crimping tools & dies for the crimping process as specified in the instruction sheet.
    • Step 3: Pull the switch on the crimping tool to insert and place the dyes correctly.
    • Step 4: Complete the crimping process as shown.

    Note: Once the crimping is done, remove the excess material and clean the connection surfaces to avoid resistance and corrosion.

    Watch this video to understand it better:


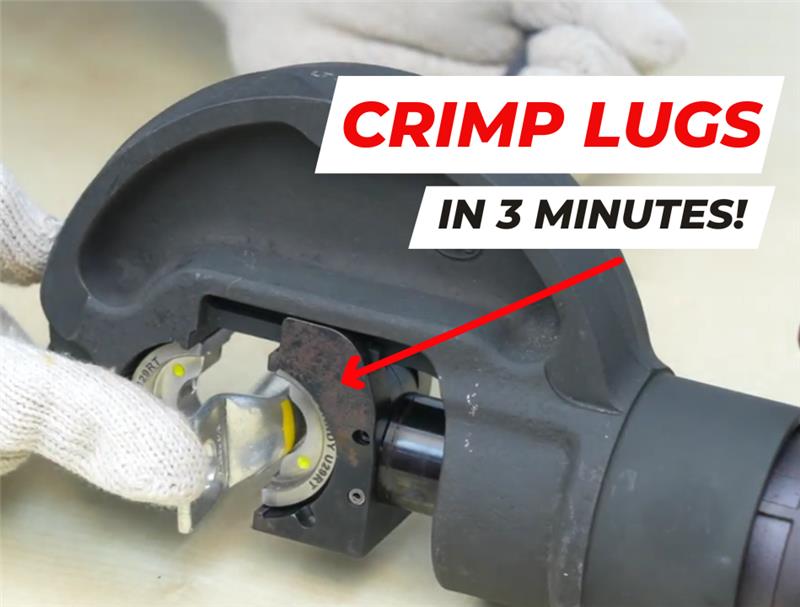
    Congratulations you have now successfully crimped your single hole cable and lug using the crimping tool.

    I hope you have a clear understanding of crimping lugs and connectors. At Axis, we have a team of 50+ engineers to design and support your project needs for Lugs & Connectors, Earthing & Lightning Protection, and many more.


    Thank you for reading and if you found this informative, then feel free to contact us to get a quote or to know more about our products; visit our product section at https://axis-india.com/products/ 

    Follow us on LinkedIn for regular updates on our Products!https://axis-india.com/products/

    aman sharma

    Recent Posts

    Types of Earthing Compound Powders

    Earth resistance is the measure of how easily electric current can flow from an electrode…

    4 weeks ago

    How to install lightning arrester on building?

    Lightning arrester rods, surge arresters, or lightning conductors are metal rods installed on a building…

    1 month ago

    Protective Angle Method for Lightning Protection Design

    Follow us on LinkedIn for the latest updates  The protective angle method is one of…

    1 month ago

    Earthing for Substations – IEEE 80

    In this trending era of technology and development, earthing in substations plays a vital role.…

    1 month ago

    Role of Down Conductors in Lightning Protection

    The electrically conductive connection between the air-termination system and the earth-termination system is the down…

    1 month ago

    GI vs Copper Plate Earthing – Which one is better?

    In this blog, we're focusing on the essential differences between Galvanised Iron Pipe Earthing, also…

    1 month ago